Tuesday, May 31, 2016

Final Reflection

This course is very meaningful and useful to my future architect career. In the beginning of the course, I knew nothing about metal shaping and I was quite confused about the assignments and submissions, I did not expect this course to bring so many benefits to me.

In the first submission, I underestimated the time needed to fabricate a beautiful skin. I remember my first attempt was a disaster, and it was made less than one week before the deadline, which really made me worried and panic. However, this became my motivation. I started to make experimentation and try to explore new solutions to shape the metal skin. This process is actually very important to an architect, as designing a building is all about problem solving, to find the best solution to resolve the situation in an architectural sense. Throughout the experimentation, I developed my metal shaping skills and I notice the improvement of each new attempt.

In the second submission, I am more confident with my metal shaping skills, so I chose to fabricate the sneaker skin, which has lots of curvatures, which is much more challenging than my first object (handheld vacuum), which has a straightforward streamline. In this project I further developed my skills through using some new tools and techniques. I really like the idea of trying different techniques and tools, as there are no right or wrong in metal shaping, there are lots of possibilities, just like architectural design.

To conclude, the two objects in the course helped me to explore shapes and forms, which brings me new inspirations. Before this course, my architectural ideas are mostly squarish and rigid. This course has provide me with opportunities to try new things, such as making some streamlined and curved templates and metal skins.


Sunday, May 29, 2016

Interdisciplinary Tutorial: Sneaker

The Template
This sneaker template is a challenging shape to make, because it involves a lot of curvatures. This object is very different from the handheld vacuum, a handheld vacuum is a man-made object with a straightforward streamline. However, a sneaker is more of an organic shape, as it is made to fit the human foot. So, in order to fabricate an accurate sneaker skin, we have to be able to create so nice and smooth curvatures, which involves some new and more challenging techniques. Enjoy the tutorial!

Part 1: Size Measurement And Metal Sheet Cutting


First, use a string to measure the length and width of the template. It is a good idea to have a mate helping you to mark the measurements, as accurate measurements allow you to cut an accurate metal sheet, hence you don't have to waste additional time to recut an inaccurate skin later.


After the measurement, use a dark and thick pen to mark the shape on the metal sheet. You don't have to worry about the marks, they will fade out gradually during your metal shaping process, and you can sand the marks away too.


When cutting the metal sheet. Make sure you get each single cut as long as possible, as short cuts will cause uneven cuts. Watch the video to see how my hands move.


Now we are ready to shape the metal skin.

Part 2: Shaping the Metal Sheet

Draw the fold line on the skin and we will stretch and fold the skin along this line.


Use the sharp edge of the mallet to hit along the fold line. Be patient and keep hammering along the line the stretch the skin, try to hit as accurately on the line as you can.

Use the round edge to stretch the bottom part of the skin in order to create the natural curve shape of the sneaker.

Use the shrinker to help yourself getting a more obvious fold line. However, beware NOT to over rely on it, as the shrinker will leave some scratch marks on your metal skin, which are extremely hard to get rid of. 


This does not fit quite well.


Notice the big gap between the skin and the template. I am going to mark the bulged out part of the skin and push it in to fit the template.


I am choosing a diagonal shaped timber to hammer on, and notice i used a flat mallet instead of a round one. Be patient as it takes time to push in the bulged out part.


Watch the video to see my hammering motion. 


The gap is much smaller now.


Part 3: Smoothening and Curving the Metal Skin

Now the skin starts to fit. However, it is very diagonal and does not resemble the organic shape of a sneaker. In this part, I am going to smoothen the diagonal part of the skin to make it fits nicely to the template.

Position this curved steel dolly as shown in the image above. Place the diagonal edge of the skin on it and start to smoothen it, this takes time so be patient.

Make use of this dolly to smoothen the head of the sneaker skin.


Now the diagonal edges are all gone and it really resembles organic the shape of a sneaker.


See how closely the skin adheres to the template.

Final Skin


I hope you enjoy the tutorial. Have fun making lots of beautiful skins!

Reflection

I chose this object from another student because it has an organic shape that contrasts with the diagonal and streamlined shape of my own found object. As an future architects, we will have chance to design buildings in diagonals and curves, so I think the two objects help me to explore different forms and shapes.
I am quite happy with the final skin. However, I think I might do better if I made use of more equipments in the fab lab. For example, I have not got a chance to use the English Wheel to smoothen the metal skin, so the final product is not as smooth as I expect.

Saturday, May 28, 2016

First Tutorial: Handheld Vacuum

The Template
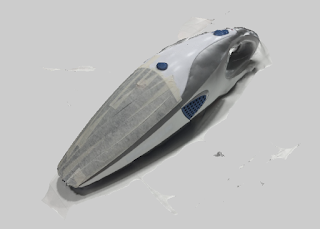
This handheld vacuum has a beautiful streamline feature. In this tutorial I want to emphasise/focus on shaping this streamline feature, so I am just going to shape half of the template, so the streamline feature will be shaped more precisely and accurately. Enjoy!

Part 1: Object Capturing And Laser Cutting

123D Catch Initial Capture

Download 123D Catch app on a smartphone to do the capture. Note that I have applied some masking tape on the reflective surface of the vacuum in order to get the best result. Also, I suggest taking at least 40 images to get a more detailed and accurate capture.

The capture is then exported to Meshmixer for further refinement, this includes clearing out the background and smoothening up the model. Remember to make solid after you have done all your modification, if not the model will not work in 123D Make, which is the next step.

My final choice of material is 1.6mm plywood. I choose a thinner thickness so the final template can resemble more accurate curves and streamline features of the vacuum. The template is going to be assembled with 44 stacked slices.
Remember to set the right colour for your laser cut file, red line work for cut through parts and blue line work for engraving parts, set the line weight to 0.001mm for the most accurate result.

Glue the pieces patiently and slowly using UHU glue. Then the template is done!

Part 2: Size Measurement And Metal Sheet Cutting


First, use a string to measure the length and width of the template. It is a good idea to have a mate helping you to mark the measurements, as accurate measurements allow you to cut an accurate metal sheet, hence you don't have to waste additional time to recut an inaccurate skin later.

After the measurement, use a dark and thick pen to mark the shape on the metal sheet. You don't have to worry about the marks, they will fade out gradually during your metal shaping process, and you can sand the marks away too.

The cutting process involves 2 tools, the large cutter (left) and the small cutter (right). First, use the large cutter to trim the metal sheet into a smaller rectangular shape. Second, use the small cutter to cut the shape of the skin, be really careful when cutting in order to get an accurate shape and to protect your hands.

Part 3: Shaping the Metal Sheet

As I mentioned before, I want to shape the accurate streamline feature of the template. So we start by marking the streamline on the metal sheet. Later I will hammer along this line in order to get the streamline part stretched.

Remember to use the sharper edge of the mallet to hit along the streamline, so the line will be more accurate and obvious. As you can see from the above image, the fold line is starting to show.

As you can see from the above image, the fold line is starting to show.

Keep hammering along the line to get the metal sheet closer to the template.

Use the shrinker to help yourself getting a more obvious fold line. However, beware NOT to over rely on it, as the shrinker will leave some scratch marks on your metal skin, which are extremely hard to get rid of. 

As you keep folding the skin along the streamline, you will notice the edge of skin starts to fold as well. This could be annoying so we will have to shrink the excessive edge in the next step.

Find a shape that is close to your template to hammer on, in order to get the metal sheet evenly shaped. Also, use a flat mallet. You have to be patient with this part in order to get the edge of the skin beautifully shrunk. Keep hammering on the shape for the next 30 minutes, you will notice the skin to adhere to much closer to the template after this.

Now let's work at the handle part of the vacuum, which involves a rounder and narrower shape. The log shown above has a nice shape to follow.

Keep working back and forth the mentioned processes above, then you should be able to get the shape of the template, and the beautiful streamline.

Part 4: Final Touch

After you have got the overall shape of the template, it is time to smoothen some rough surfaces. The curved steel dolly shown above has a nice shape that adheres the handheld vacuum. Hammer on this dolly to smoothen the rough edge of the skin, and make use of this thin dolly to refine the narrow shape of the head of the skin.

Finally, use a round dolly to further smoothen any bulged out part of the skin, as it is easy to have lots of little bulged out part during the whole shaping process.

The skin adheres closely to the template. 

I hope you enjoy the tutorial. Have fun making lots of beautiful skins!